SAGA Age of Magic: SOLO SHOWDOWN: The Undead Legion vs Lords of the Wild
Welcome back to another rousing game of SAGA Age of Magic. Tonight, I once again played myself using my Undead Legion and Lords of the Wild warbands. I'd been hankering to try the legendary Undead warband, The Royal Dynasty of Nephren-Ka, and take those characterful dynastic chariots for a spin. I wasn't sure how well they'd play, especially since I've never used cavalry with composite bows before, but how bad could it be?
I created two warbands of six points, as listed below:
THE UNDEAD LEGION 6 pts (The Royal Dynasty of Nephren-Ka)

Necromancer
-mount: animal
-spells: Slowed Time, Rush, Drain Life
Sorcerer 1 pt
-spells: Ritual, Precognition, Eruptions
*Edit: According to the FAQ, units with the keyword "Magic" count as sorcerers, even if they do not possess that keyword. Therefore, the necromancer would be the only sorcerer allowed in this list, per the special rules of the legendary warband.
4 Dynastic Chariots 2 pts
16 Warriors 2 pts
*Edit: Aside from Mindless, units in Saga cannot exceed 12 miniatures, except for Heroes. Thanks to Michael Lambros.
Scourge 1 pt
My strategy was to use my enormous unit of warriors as a tar pit, occasionally buffing them with Precognition or sending them flying with Eruptions via their friendly local Sorcerer. When not buffing his unit, the Sorcerer would instead cast ritual, enabling the Necromancer to better enchant the chariots, which he'd be following around. The Scourge would act as a harrier with breath attacks and choice charges on weakened units.
As stated before, I had never used cavalry with composite bows before, so all my chariot planning was mental. However, as the chariots already benefited from Determination, I figured a chaperoning Necromancer with We Obey would keep them cheap to operate, freeing up my SAGA dice for other nefarious activities. Before we begin, you'll need to understand how my mental plan worked.
Step 0: If necessary, use Determination to rest the chariots from previous turns.
Step 1: Use the Sorcerer to cast Rush on the chariots to move the chariots L towards the enemy, bringing them within firing range (M). Rush is a neat spell, since it (at minimum) gives a unit a free move. At optimum, is allowed the unit to move or charge for free AND allows that move/charge to be ignored when calculating fatigue for future activations. It can also be used maximally to for further shenanigans, namely to move/charge for free, then, after it is resolved, activate the unit a second time to move or charge. This second activation does not generate fatigue and is likewise free (does not cost SAGA dice).
Step 2: Use composite bows (freely activated by the move) to fire a volley of 8 shots, as chariots are aggression 2(2), which is unusual. This free shot likewise does not generate fatigue.
Step 3: Use Determination (or a SAGA die, if Determination was used to rest prior) to bring the Necromancer within S of the chariot unit.
Step 4: Cast Slowed Time using the Necromancer onto the chariots, allowing them at minimum to ignore the first fatigue suffered after a shooting activation this turn. Optimally, Slowed Time allows the unit to activate for a shooting attack for free (once again sparing SAGA dice) which also does not generate fatigue.
Step 5: Use either Determination or SAGA dice to activate the unit of chariots to shoot a volley of 8 dice at their target. After this activation, they should still be sitting at 0 fatigue, meaning they have now fired twice without generating fatigue and at worst using only a SINGLE SAGA die.
Step 6: Rinse and repeat movement or shooting until sitting at 3 fatigue, the enemy is wiped out, or you run out of SAGA dice.
Step 7: Skedaddle with that amazing movement of L on both units to keep them out of harm's way (they should be roughly L+M away from whatever is leftover).
THE LORDS OF THE WILD 6 pts (The Minotaurs of the Black Hills)

Warlord
Sorcerer 1 pt
-spells: Transformation, Animal Prowess, Verdant Wakening
3 Bipedal creatures 1.5 pts
3 Bipedal creatures 1.5 pts
2 Bipedal creatures 1 pt
Behemoth 1 pt
My strategy here was pretty simple: "Death Star" up and rush the Undead. Hit them with sheer violence, augmented with ample bonus attack dice. Once again, use Transform the Sorcerer into a creature or mounted Warlord for extra punishment, or use him to mitigate fatigue with Animal Prowess.
I chose to crack open the Book of Battles supplement and played the Battle of Heroes skirmish using the Chaos Option. This option (aptly named) lets players randomize all of the parameters of the skirmish, including scenery, deployment, game length, special rule, and victory conditions. Here's what I rolled:

I won't go into too many specifics, but this is bad for Undead. Specifically...
Under Pressure: Starting with the fourth turn, and at the end of every turn after that, either player can announce they are ending the game after next turn. The game ends automatically after six turns, but still, not great when the Undead need to whittle down opponents with arrow peppering. Conversely, this is great for the LotW, as they can wrecking ball one turn en masse, then declare "game over!" if they believe the Undead won't be able to recover over the next turn.
Forced March: Yikes, yikes, yikes! During the first TWO turns of the game, each unit moves as if shorted using fatigue...i.e. everyone is moving S. This is bad, considering the Undead have a mounted Necromancer, chariots, and a flyer... so much for earlier game positioning!
Sacrifice: The game will be determined using massacre points (no complaint there) BUT each player scores 1 bonus massacre point if their unit is wiped out outside of melee, i.e. magic and shooting. Considering the Undead have two units relying on shooting and 1 unit with a ranged magical attack, this is looking grim.
Regardless, onward! Let's see which snaps first, branch or bone!
DEPLOYMENT
Deployment was handled using March Column, where each player effectively rolls off to see who places next. Whoever rolls higher places a unit, draws are won by the designated "first player" (the player who will get first turn). LotW had won the roll-off for first player, so they would be statistically placing units more frequently than Undead (and the dice reflected this).


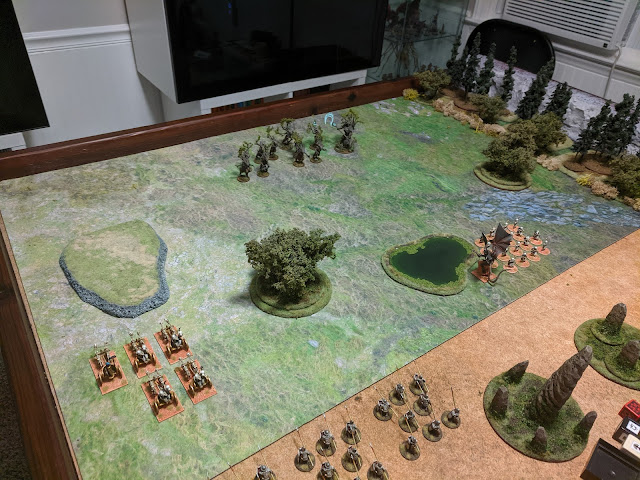
As you can see, pretty much I stuck to my initial plans when composing my lists: an anchor of Undead warriors with chariot flankers and a Death Star of mobbed-up treefolk.
TURN 1: THE LORDS OF THE WILD
Per the constraints of Forced March, this was going to be a slog. All the treefolk shuffle S towards the Undead.

TURN 1: THE UNDEAD LEGION
Likewise, this was a real trudge for my chariots, Necromancer, and Scourge. The Scourge tried to circle around the warriors and the mounted units slowly rolled towards the center of the field.

TURN 2: THE LORDS OF THE WILD & THE UNDEAD LEGION
Let's spare the effort, you can imagine what happened. The only exciting thing to occur was that I used a little fatigue to move the Behemoth, bipedal creatures, and Scourge a wee bit further.

TURN 3: THE LORDS OF THE WILD
The weights are off! Free to move normally, the LotW rested and formed a solid battle line. Next turn, a vicious was assault was unavoidable. Since very few SAGA dice had been used the previous two turns, their SAGA board was a stockpile of nasty melee abilities.

TURN 3: THE UNDEAD LEGION
Crack the whips, loose arrows! Finally, it was time to try out my grand strategy. I won't cover it again here, but it worked surprisingly well. I used the chariots fairly conservatively, choosing to leave with a single fatigue per unit rather than go-all-out. To my surprise, I was able to knock the two-model unit of creatures down to a single model and completely exhaust them! In fact, I didn't actually play the strategy optimally, instead choosing to cast Drain Life (which unfortunately whiffed). Lesson learned!


TURN 4: THE LORDS OF THE WILD
Ouch! What the heck?! Nimble, darting, Undead? Isn't that what my faction does? (yes, but not with this warband 😜)
Unfortunately for you, dear reader, I forgot the rule Primitive at this point in the game (the risk of running a game solo is no one is there to remind you of rules...) so this turn is a bit moot. However, it still was pretty incredible to see, so whatever, let's roll with it.
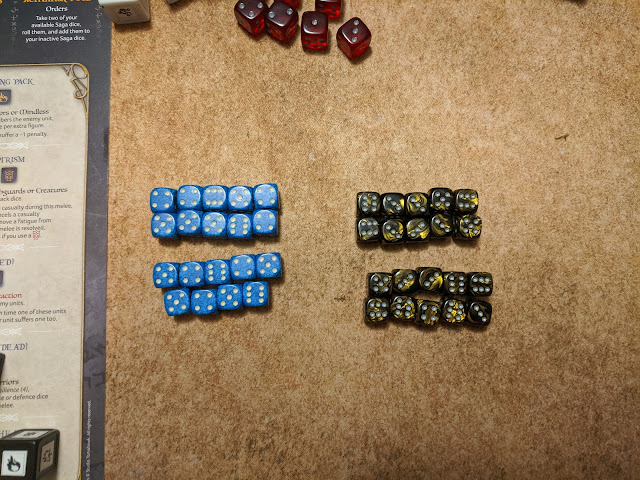
I swung the Behemoth into the Undead Warriors like a cudgel, and (erroneously) applied every advanced melee SAGA ability to the Behemoth, giving it a sickeningly large melee pool. The Undead replied by activating Howling Pack, an advanced SAGA ability that gives the Undead unit an extra combat die per ever model outnumbering the enemy, in this case twelve (I didn't forget that monsters have Presence, making them count as 4 models rather than 1). The penalty for this ability is that the Undead must lower their defense rolls by 1, meaning that rather than saving casualties on 5+, they would instead need straight 6s.

Look at these glorious combat pools. LotW using blue dice, Undead using...undead dice. That's 21 for the Behemoth and 24 for the Undead warriors. As a side note, if I had just used the equidistant creature unit, I would have actually been able to pull this off as planned and had 22 dice, but oh well.

Now, here's where things get CRAZY. This was my dice roll.

Read 'em and weep, 19 hits, 2 misses on a 4+. I won't give you the statistical improbability of this roll, but to give you an idea, I should have rolled roughly 10 to 11 hits. The Undead likewise rolled pretty darn well, needing 3+ due to lowered armor via fatigue.
Unsurprisingly, no one survived. Both units were entirely wiped out, leaving two very shaken Undead onlookers.

Lastly, some crazy magic went down on the other side of the board. Casting Animal Prowess maximally, I was able to remove three of the four fatigue from the beleaguered creature unit (the Sorcerer was fortunately untouched by the Abuse of Power roll). I then moved one of the large creature units to block the annoying chariots from easily finishing off the weakened unit.

This was a big reversal. It may not look like it, but removing all that fatigue (keeping the creature unit alive and kicking) was a huge play. Likewise, although I traded units, fatiguing two enemy units would also cost the Undead future SAGA dice. At this point, as the LotW I was ecstatic. As the Undead player, I was very, very worried. I didn't know if I could pepper enough damage onto the remaining creature units, especially if they were going to be managing fatigue so effectively. Charging in would be suicide as well, since I would be guaranteed multiple retaliatory charges the following turn. Furthermore, with Under Pressure in play, I couldn't take my time picking apart the LotW with ranged attacks- I needed to be decisive!
TURN 4: THE UNDEAD LEGION
This time, I tried my Necromancer-chariot-magic combo in full, and boy did it pay off. I also do-si-do'd in the Scourge for a breath attack. Using this strategy, I managed to obliterate not only the untouched three-model unit of creatures, but the weakened unit as well. I also exhausted the other three-model unit of creatures and even removed one model. Furthermore, the Death Star configuration backfired, as all units witnessed two unit eliminations, causing them to suffer fatigue. This was unbelievably brutal. I couldn't believe that by the end, for only 3 fatigue, I had effectively locked in the game for the Undead. To be fair, I augmented my magic dice pool with SAGA dice, cast ritual to power-up my spells, ran the risk of casting spells maximally twice, and rolled fairly decently, but still...incredible! Even without those spells, Imposing allows for up to five volleys of arrows before exhaustion...that's forty dice.


TURN 5: THE LORDS OF THE WILD
Well...OK.
With my Death Star proton torpedoed into oblivion, I did the best I could to get some more massacre points. Of course, the Undead weren't done yet, and activated Curse in response to my Orders phase, designating the remaining creature unit and sorcerer as linked souls. Regardless, I cast Transformation onto the Sorcerer, turning him into a nasty quadrupedal creature for the turn. The Sorcerer then galloped into his Undead counterpart and thoroughly eviscerated him, albeit (and surprisingly) suffering two wounds in return and exhausting him (crap!).

TURN 6: THE UNDEAD LEGION
Enjoy that minor victory, it'll be your last! Even without the aid of my Sorcerer's magic dice, I had full confidence in the now MVP status chariots. Without hesitation, they swept through the field, annihilating every remaining enemy on the board (not too crazy, considering two units were exhausted and the Warlord, starting at 1 fatigue, suffered a second after witnessing the elimination of his bodyguard). I also went hard this turn, and completely exhausted the chariots in the process, which was definitely worth it.

Even the Scourge couldn't believe it.

GAME SUMMARY: VICTORY FOR THE UNDEAD LEGION
Unbelievably, the Undead were able to pull this game around. I was utterly in shock, especially after rolling using the Chaos Option from the Book of Battles. As far as I know, I played the chariots correctly, though I can't believe how incredible they are. I'd like to play them again against a warband with more mobility or range, so that they can't simply out-maneuver every threat, however.
Thanks for reading!
-Nick
I created two warbands of six points, as listed below:
THE UNDEAD LEGION 6 pts (The Royal Dynasty of Nephren-Ka)

Necromancer
-mount: animal
-spells: Slowed Time, Rush, Drain Life
Sorcerer 1 pt
-spells: Ritual, Precognition, Eruptions
*Edit: According to the FAQ, units with the keyword "Magic" count as sorcerers, even if they do not possess that keyword. Therefore, the necromancer would be the only sorcerer allowed in this list, per the special rules of the legendary warband.
4 Dynastic Chariots 2 pts
16 Warriors 2 pts
*Edit: Aside from Mindless, units in Saga cannot exceed 12 miniatures, except for Heroes. Thanks to Michael Lambros.
Scourge 1 pt
My strategy was to use my enormous unit of warriors as a tar pit, occasionally buffing them with Precognition or sending them flying with Eruptions via their friendly local Sorcerer. When not buffing his unit, the Sorcerer would instead cast ritual, enabling the Necromancer to better enchant the chariots, which he'd be following around. The Scourge would act as a harrier with breath attacks and choice charges on weakened units.
As stated before, I had never used cavalry with composite bows before, so all my chariot planning was mental. However, as the chariots already benefited from Determination, I figured a chaperoning Necromancer with We Obey would keep them cheap to operate, freeing up my SAGA dice for other nefarious activities. Before we begin, you'll need to understand how my mental plan worked.
Step 0: If necessary, use Determination to rest the chariots from previous turns.
Step 1: Use the Sorcerer to cast Rush on the chariots to move the chariots L towards the enemy, bringing them within firing range (M). Rush is a neat spell, since it (at minimum) gives a unit a free move. At optimum, is allowed the unit to move or charge for free AND allows that move/charge to be ignored when calculating fatigue for future activations. It can also be used maximally to for further shenanigans, namely to move/charge for free, then, after it is resolved, activate the unit a second time to move or charge. This second activation does not generate fatigue and is likewise free (does not cost SAGA dice).
Step 2: Use composite bows (freely activated by the move) to fire a volley of 8 shots, as chariots are aggression 2(2), which is unusual. This free shot likewise does not generate fatigue.
Step 3: Use Determination (or a SAGA die, if Determination was used to rest prior) to bring the Necromancer within S of the chariot unit.
Step 5: Use either Determination or SAGA dice to activate the unit of chariots to shoot a volley of 8 dice at their target. After this activation, they should still be sitting at 0 fatigue, meaning they have now fired twice without generating fatigue and at worst using only a SINGLE SAGA die.
Step 6: Rinse and repeat movement or shooting until sitting at 3 fatigue, the enemy is wiped out, or you run out of SAGA dice.
Step 7: Skedaddle with that amazing movement of L on both units to keep them out of harm's way (they should be roughly L+M away from whatever is leftover).
THE LORDS OF THE WILD 6 pts (The Minotaurs of the Black Hills)

Warlord
Sorcerer 1 pt
-spells: Transformation, Animal Prowess, Verdant Wakening
3 Bipedal creatures 1.5 pts
3 Bipedal creatures 1.5 pts
2 Bipedal creatures 1 pt
Behemoth 1 pt
My strategy here was pretty simple: "Death Star" up and rush the Undead. Hit them with sheer violence, augmented with ample bonus attack dice. Once again, use Transform the Sorcerer into a creature or mounted Warlord for extra punishment, or use him to mitigate fatigue with Animal Prowess.
I chose to crack open the Book of Battles supplement and played the Battle of Heroes skirmish using the Chaos Option. This option (aptly named) lets players randomize all of the parameters of the skirmish, including scenery, deployment, game length, special rule, and victory conditions. Here's what I rolled:

I won't go into too many specifics, but this is bad for Undead. Specifically...
Under Pressure: Starting with the fourth turn, and at the end of every turn after that, either player can announce they are ending the game after next turn. The game ends automatically after six turns, but still, not great when the Undead need to whittle down opponents with arrow peppering. Conversely, this is great for the LotW, as they can wrecking ball one turn en masse, then declare "game over!" if they believe the Undead won't be able to recover over the next turn.
Forced March: Yikes, yikes, yikes! During the first TWO turns of the game, each unit moves as if shorted using fatigue...i.e. everyone is moving S. This is bad, considering the Undead have a mounted Necromancer, chariots, and a flyer... so much for earlier game positioning!
Sacrifice: The game will be determined using massacre points (no complaint there) BUT each player scores 1 bonus massacre point if their unit is wiped out outside of melee, i.e. magic and shooting. Considering the Undead have two units relying on shooting and 1 unit with a ranged magical attack, this is looking grim.
Regardless, onward! Let's see which snaps first, branch or bone!
DEPLOYMENT
Deployment was handled using March Column, where each player effectively rolls off to see who places next. Whoever rolls higher places a unit, draws are won by the designated "first player" (the player who will get first turn). LotW had won the roll-off for first player, so they would be statistically placing units more frequently than Undead (and the dice reflected this).


As you can see, pretty much I stuck to my initial plans when composing my lists: an anchor of Undead warriors with chariot flankers and a Death Star of mobbed-up treefolk.
TURN 1: THE LORDS OF THE WILD
Per the constraints of Forced March, this was going to be a slog. All the treefolk shuffle S towards the Undead.

Likewise, this was a real trudge for my chariots, Necromancer, and Scourge. The Scourge tried to circle around the warriors and the mounted units slowly rolled towards the center of the field.

TURN 2: THE LORDS OF THE WILD & THE UNDEAD LEGION
Let's spare the effort, you can imagine what happened. The only exciting thing to occur was that I used a little fatigue to move the Behemoth, bipedal creatures, and Scourge a wee bit further.

TURN 3: THE LORDS OF THE WILD
The weights are off! Free to move normally, the LotW rested and formed a solid battle line. Next turn, a vicious was assault was unavoidable. Since very few SAGA dice had been used the previous two turns, their SAGA board was a stockpile of nasty melee abilities.

TURN 3: THE UNDEAD LEGION
Crack the whips, loose arrows! Finally, it was time to try out my grand strategy. I won't cover it again here, but it worked surprisingly well. I used the chariots fairly conservatively, choosing to leave with a single fatigue per unit rather than go-all-out. To my surprise, I was able to knock the two-model unit of creatures down to a single model and completely exhaust them! In fact, I didn't actually play the strategy optimally, instead choosing to cast Drain Life (which unfortunately whiffed). Lesson learned!


TURN 4: THE LORDS OF THE WILD
Ouch! What the heck?! Nimble, darting, Undead? Isn't that what my faction does? (yes, but not with this warband 😜)
Unfortunately for you, dear reader, I forgot the rule Primitive at this point in the game (the risk of running a game solo is no one is there to remind you of rules...) so this turn is a bit moot. However, it still was pretty incredible to see, so whatever, let's roll with it.
I swung the Behemoth into the Undead Warriors like a cudgel, and (erroneously) applied every advanced melee SAGA ability to the Behemoth, giving it a sickeningly large melee pool. The Undead replied by activating Howling Pack, an advanced SAGA ability that gives the Undead unit an extra combat die per ever model outnumbering the enemy, in this case twelve (I didn't forget that monsters have Presence, making them count as 4 models rather than 1). The penalty for this ability is that the Undead must lower their defense rolls by 1, meaning that rather than saving casualties on 5+, they would instead need straight 6s.

Look at these glorious combat pools. LotW using blue dice, Undead using...undead dice. That's 21 for the Behemoth and 24 for the Undead warriors. As a side note, if I had just used the equidistant creature unit, I would have actually been able to pull this off as planned and had 22 dice, but oh well.

Now, here's where things get CRAZY. This was my dice roll.

Read 'em and weep, 19 hits, 2 misses on a 4+. I won't give you the statistical improbability of this roll, but to give you an idea, I should have rolled roughly 10 to 11 hits. The Undead likewise rolled pretty darn well, needing 3+ due to lowered armor via fatigue.

Unsurprisingly, no one survived. Both units were entirely wiped out, leaving two very shaken Undead onlookers.

Lastly, some crazy magic went down on the other side of the board. Casting Animal Prowess maximally, I was able to remove three of the four fatigue from the beleaguered creature unit (the Sorcerer was fortunately untouched by the Abuse of Power roll). I then moved one of the large creature units to block the annoying chariots from easily finishing off the weakened unit.

This was a big reversal. It may not look like it, but removing all that fatigue (keeping the creature unit alive and kicking) was a huge play. Likewise, although I traded units, fatiguing two enemy units would also cost the Undead future SAGA dice. At this point, as the LotW I was ecstatic. As the Undead player, I was very, very worried. I didn't know if I could pepper enough damage onto the remaining creature units, especially if they were going to be managing fatigue so effectively. Charging in would be suicide as well, since I would be guaranteed multiple retaliatory charges the following turn. Furthermore, with Under Pressure in play, I couldn't take my time picking apart the LotW with ranged attacks- I needed to be decisive!
TURN 4: THE UNDEAD LEGION
This time, I tried my Necromancer-chariot-magic combo in full, and boy did it pay off. I also do-si-do'd in the Scourge for a breath attack. Using this strategy, I managed to obliterate not only the untouched three-model unit of creatures, but the weakened unit as well. I also exhausted the other three-model unit of creatures and even removed one model. Furthermore, the Death Star configuration backfired, as all units witnessed two unit eliminations, causing them to suffer fatigue. This was unbelievably brutal. I couldn't believe that by the end, for only 3 fatigue, I had effectively locked in the game for the Undead. To be fair, I augmented my magic dice pool with SAGA dice, cast ritual to power-up my spells, ran the risk of casting spells maximally twice, and rolled fairly decently, but still...incredible! Even without those spells, Imposing allows for up to five volleys of arrows before exhaustion...that's forty dice.


TURN 5: THE LORDS OF THE WILD
Well...OK.
With my Death Star proton torpedoed into oblivion, I did the best I could to get some more massacre points. Of course, the Undead weren't done yet, and activated Curse in response to my Orders phase, designating the remaining creature unit and sorcerer as linked souls. Regardless, I cast Transformation onto the Sorcerer, turning him into a nasty quadrupedal creature for the turn. The Sorcerer then galloped into his Undead counterpart and thoroughly eviscerated him, albeit (and surprisingly) suffering two wounds in return and exhausting him (crap!).

TURN 6: THE UNDEAD LEGION
Enjoy that minor victory, it'll be your last! Even without the aid of my Sorcerer's magic dice, I had full confidence in the now MVP status chariots. Without hesitation, they swept through the field, annihilating every remaining enemy on the board (not too crazy, considering two units were exhausted and the Warlord, starting at 1 fatigue, suffered a second after witnessing the elimination of his bodyguard). I also went hard this turn, and completely exhausted the chariots in the process, which was definitely worth it.

Even the Scourge couldn't believe it.

GAME SUMMARY: VICTORY FOR THE UNDEAD LEGION
Unbelievably, the Undead were able to pull this game around. I was utterly in shock, especially after rolling using the Chaos Option from the Book of Battles. As far as I know, I played the chariots correctly, though I can't believe how incredible they are. I'd like to play them again against a warband with more mobility or range, so that they can't simply out-maneuver every threat, however.
Thanks for reading!
-Nick


Comments
Post a Comment