Hey folks!
Time for another left turn- let's paint some Space Marines!
I initially started collecting Iron Hands space marines back in 2009, creating a full force of dreadnoughts, marines, speeders, heavy vehicles, and a full retinue of heroes. With the introduction of the "Rubicon Primaris" and the introduction of 9th edition, I figured it might be time to reboot my force with the new miniature line. To see some photos of my original Iron Hands army, you can see them
here.
To kick off my force, I acquired a Dark Imperium box set which sat on my shelf for many months, if not years. Naturally, I felt the best place to start would be with some line troopers, in this case the ubiquitous Intercessors.
Likewise, I invested in some Iron Hands conversion bits, courtesy of Games Workshop, as my previous force had taken heaps of time and effort in careful conversions and modifications (which often required constant repairs).
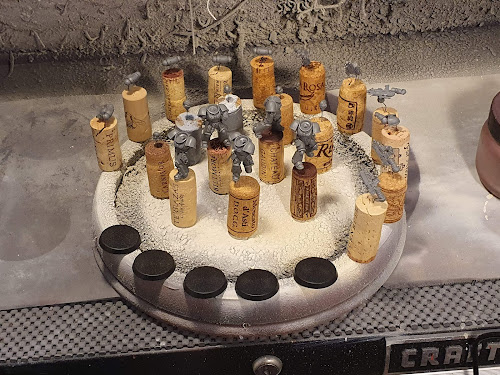
Intercessors awaiting primer.
To aid in painting, I kept arms, backpacks, heads, and bodies separate, as I wanted to prevent occluded areas. Furthermore, as a grizzled hobbyist, I wanted to settle on a paint palette before touching any of my new, expensive miniatures. I instead experimented on some old, firstborn marines that had been sitting in my bits box. Happy with the outcome, I decided it was time to move forward.
A small test piece.
The palette is decided!
Here's an initial milestone of my first intercessor. Note the missing arms and lack of decals. It's been a long time since I worked with decals on curved surfaces, so I once again experimented on my poor firstborn marine. Happy with my work using Micro Sol and Micro Set, I was able to work the domed and curved surfaces in away that felt good enough to me.
Decals soaking in common tap water.
Micro Set: This stuff helps the decal bond to the mini's surface. I like to prepare the surface of the miniature with gloss varnish, as it provides a smooth area to work with. Make sure to work quickly when placing your decals, otherwise they might settle somewhere unfortunate. I use a wet brush to manipulate my decals, but occasionally a finger or rubber sculpting tool might be used in desperation.
Micro Sol: The second half of this dastardly combo. Micro Sol softens decals, allowing them to conform to non-flat surfaces (which happen to be many surfaces). Micro Sol needs to be used delicately, otherwise you run the risk of folding, tearing, distorting, or accidentally shifting decals. I work in multiple sessions, allowing the decal to slowly conform and settle.
First pass, notice how the decal is lifting off the surface.
Final result- nice and curved to the pauldron.
Here are some shots of a marine with all his decals Micro Sol'd and Set. This took some time and patience, but damn does it pay off.
However, I felt that the decals were a bit too clean overall, so I went back with some Army Painter Soft Tone and Blue Tone to add shading.
I painted my first two squaddies one at a time to better hone my technique. After knocking them out, I batch painted the next three as a unit. Progress shots below!

Powerpacks looking sharp.
Some bodies without arms and heads.
The squad is nearly complete, but three fellows have lost their heads.
For the cybernetic heads, I really went all out. I wanted these to stand out as they are the most characterful part of the minis and faction overall. I worked very hard to tone the skin, giving it a bit more depth and anatomical veracity. Notice the red hues in nose and cheek as well as the purple tones around the eyes.
Finally, here's the fully assembled squad. Please forgive the cork bases, as I'm waiting on some cool basing supplies before finalizing these guys.
Notice the gauntlet-mounted radar thing.
I hope you've enjoyed this blog as much as I did working on these minis. More updates to come soon!
-Nick
P.S.
For those interested, here's my paint recipe list.
Black Armor:
-Black 70.950
-Anthrachite Grey 71.052
-Sea Grey 71.049
-Light Grey 71.050
-Army Painter Blue Tone
-Sky Grey 70.989

Decals:
-Wash with mix of AP Blue Tone and Soft Tone
Joints:
-Light Grey 71.050
-AP Blue Tone
-AP Strong Tone
-Light grey 71.050

Metal:
-Gun Metal 71.072
-AP Strong Tone
-Aluminum 71.062
-AP AP Blue Tone selectively

White:
-Sky Grey 70.989
-AP Soft Tone
-Sky Grey 70.989
-White 70.951

Leather:
-Sea Grey 71.049
-AP Soft Tone
-Sea Grey 71.049
-Sky Grey 70.989
-AP Purple Tone selectively

Parchment:
-Sky Grey 70.989
-AP Soft Tone
-Sky Grey 70.989
-White 70.951
-Black Ink 72.094 (for script)

Red Wax:
-Sky Grey 70.989
-AP Red Tone X2
-Sky Grey 70.989
-Red Ink 72.086
-White 70.951
-AP Purple Tone selectively
Red Eyes:
-Sky Grey 70.989
-Vermillion 70.909
-Skin Tone 71.076
-AP Red Tone
-Red Ink 72.086 selectively
-White 70.951

Red Scope Lens
-Sky Grey 70.989
-Vermillion 70.909
-Black 70.950 selectively
-AP Red Tone selectively
-Skin Tone 71.076
-Red Ink 72.086 selectively
-White 70.951
Radar:
-Black Green 70.980\
-Intermediate GReen 70.891
-Lime Green 70.827
-White 70.951
-AP Green Ink
-P3 Yellow Ink
Skin:
-Sky Grey 70.989
-Skin Tone 71.076 or Flat Flesh 70.955
-AP Flesh Wash
-Skin Tone 71.076 or Flat Flesh 70.955
-Silver Grey 70.883
-White 70.951
-AP Red Tone
-AP Purple Tone
Orange Light:
-Sky Grey 70.989
-Clear Orange 70.956
-Skin Tone 71.076
-AP Red Tone
-Skin Tone 71.076
Blue Light
-Sky Grey 70.989
-Sky Blue 70.961
-AP Blue Tone
-Sky Blue 70.961
Red Cable:
-Sky Grey 70.989
-Vermillion 70.909
-Skin Tone 71.076
-Red Ink 72.086
-Skin Tone 71.076
Yellow Cable:
-Sky Grey 70.989
-Flat Yellow 70.953
-AP Flesh Wash
-Flat Yellow 70.953
-Silver Grey 70.883
/pic3670756.jpg)


Comments
Post a Comment